Make a Peg Family

by Heather Mann, Dollar Store Crafts
I wanted to make peg people for SO long before I made these ones — I had the pegs in my stash for at least two years! My kids love playing with these little peg versions of our family members – and I think they’re so cute, I want to make a set of them to keep all to myself.
You can use old-fashioned wooden clothespins (find them in the craft or laundry section at your local dollar store), or buy peg doll blanks from your local craft store or on Etsy. . There are different shapes and sizes for males and females, adults, children, toddlers, and babies. I just used the male shape because that’s all my craft store had. If you want more selection, definitely go the Etsy route.
Don’t worry if your drawing/painting skills aren’t as refined as you wish they were. Your children can recognize family members with just the barest suggestion of reality.
You Need:
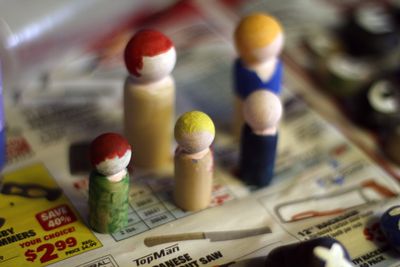
- A blank peg doll for each family member
- Acrylic craft paint
- Fine paintbrushes (at least one super fine brush is helpful)
- Clear acrylic spray sealant
- (optional) Primer
To Make:
1. Prime: If desired, paint pegs with primer before you begin. Allow to dry.
2. Sketch: If you want, while you are waiting for your primer to dry, you can sketch out ideas for how you will dress your people. I decided to paint clothes that we wear regularly. My sons were really excited when they saw little peg versions of themselves wearing clothes they recognized. You can sketch features lightly with pencil on the pegs.
3. Paint skin: Paint the heads and necks with skin colored paint. (Tip: It can be tricky to mix up a good skin color, so you might want to buy a bottle of paint that most closely resembles your skin color. Or not, if you don’t care!)
4. Paint clothing: Paint bottom half of dolls (pants, shorts, skirts, etc.). Allow to dry, then paint shirts. To get a t-shirt collar look, paint all the way up to where the neck narrows. Allow to dry.
5. Paint hair. Paint hair base color and then allow to dry. Add highlights, parts, curls, etc. if desired.
6. Paint eyes: paint white dots for eyes. Allow to dry, then using the appropriate eye color, dot a teeny bit of paint on the white dots to make irises. When that is dry, dot an even smaller black dot in the middle of the iris. When the eyes are completely dry, add a white highlight dot (the smallest one yet) near the top of the irises.
7. Add detail: Now you can add detail to the clothing, hair, and faces. I added an upside-down ‘V’ on the front for pant legs in white, sleeves and arms on the sides of the body, and glasses on the people who wear them. I also painted a tractor on one boy-peg’s shirt, and jammies for the other boy-peg’s shirt. Oh, and don’t forget the mouths!
Don’t worry, if it doesn’t come out the way you want, you can always re-paint it!
8. Seal it: When you’re happy with your peg, spray it with clear acrylic sealer to keep the paint from rubbing off (as it inevitably will when kids play with it). You might want to skip this step if your kids are still young enough to put things in their mouths. Oh, and these are small enough that they could be choking hazards for those kids, too, so better just keep them away from the really-littles.
Alternately: Instead of paint, you can use fine-tipped markers to draw on your pegs. This is a great option for kids, since it’s not quite as messy as paint.
Additional Resources:
- I love these peg doll necklaces from Grace Violet
- How to paint a peg doll face by The Masked Mommy
- Super cute fairy peg doll playset at Mama Dramalogues
 Heather Mann is the mom of three boys under 4, and is the founder of DollarStoreCrafts.com, a daily blog about crafting on the cheap, and CraftFail.com, a community blog devoted to sharing our own crafting blunders.


